Writing a new article
Walkthrough of the creation of a new article.
This tutorial will show you how to add an article to your own help center. At the end, you will have added a new article to the help center running locally. The next section then shows how to edit the content. And the final step shows how to deploy the help center to the internet, so that anyone can access it.
Prerequisites
You must have the help center running locally. See this article if that’s not the case yet.
Preparing a folder
First you’ll need to create a new folder inside content. The name of the folder will be the slug of your article. For example, when you create a folder called my-first-article, then your article will be accessible at yourwebsite.com/articles/my-first-article.
This folder will contain all assets of that article. The next step shows how to set up the content of your article.
It is recommended to never change the name of a folder after an article has been created. If you change the folder-name afterwards, the slug would change. And that would mean everything link with the old location of your article would now break.
Adding the article contents
Next, you’ll need to create a file called index.md inside the folder you just created (my-first-article in our example). The .md file extension is called Markdown. Markdown is a special way to write text. It lets you add formatting and meta-information just by writing text.
Add the following content to your index.md file.
---
title: My first article
date: 2020-01-01T00:00:00.000Z
author: bert
modifiedDate: null
description: "This is the first article I ever added."
---

Hello world
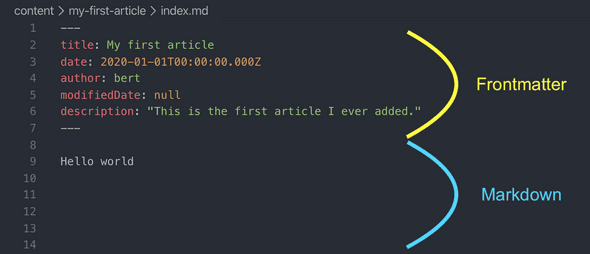
The stuff inside the --- lines is called front matter. The front matter is meta information about your article. It is written in a syntax called YAML. Everything after that is used as the content of your article. It is written in a syntax called Markdown. The screenshot below may make this clearer:
Previewing your article
You can now check out your newly created article by navigating to http://localhost:8000/articles/my-first-article. We know the slug (the /articles/my-first-article part) since it is determined by the folder this article is in.
We recommend you keep a flat hierarchy. Do not create subfolders as that will only make it more likely that you’ll later break the URLs of your articles in case you inevitably reorganize your folder structure.
Adding your article to a collection
Now that you’ve got an article, you’ll want to add it to a collection. Open the file in data/collections.yml.
Around line 25 of that file you’ll see a part which looks like this:
- id: introduction
  title: Introduction
  description: Brief overview of the free help center
  icon: "FaRegHandPeace"
  articles:
    - file: ../content/welcome/index.md
You can add your newly created article to the introduction collection by appending it to the articles section there.
Add a new line at the end of the block so that this part looks like this:
- id: introduction
  title: Introduction
  description: Brief overview of the free help center
  icon: "FaRegHandPeace"
  articles:
    - file: ../content/welcome/index.md
    - file: ../content/my-first-article/index.md
If you now go to http://localhost:8000 and open the “Introduction” collection, you’ll see your newly created article in the second position of that collection.
In the next section, you’ll learn more about how to manage collections, sections and their articles.
